We may earn money or products from the companies that may be mentioned in this post.
So, you’ve recently taken up the exhilarating sport of golf and find yourself searching for ways to stand out on the greens. Look no further, as we have just the thing for you: a beginner’s guide to painting golf balls. Whether you want to add a personal touch to your equipment or simply make your golf balls easier to spot, this article will provide you with all the tips and tricks you need to create your own custom designs. From selecting the right materials to mastering the art of precision, get ready to take your golf game to a whole new level with some colorful creativity!

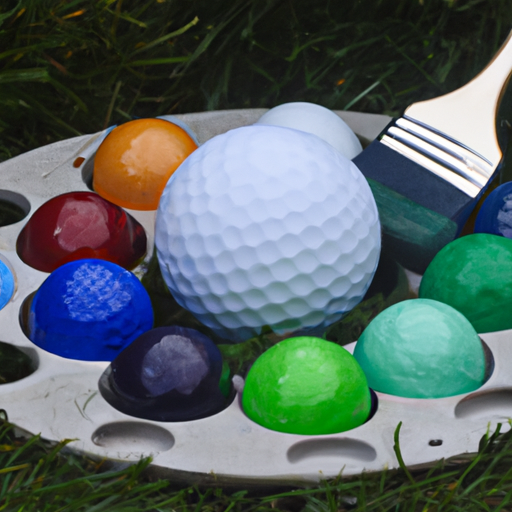
Choosing the Right Supplies
When it comes to painting golf balls, choosing the right supplies is essential for a successful and satisfying outcome. From selecting the golf balls themselves to gathering the necessary paints, brushes, and tools, each decision you make will impact the final result of your painted golf balls.
Selecting the Golf Balls
The first step in painting golf balls is selecting the right ones for your project. It’s important to choose golf balls that have a smooth and clean surface, as this will ensure that the paint adheres well and lasts longer. You can use either used golf balls or new ones, depending on your preference and budget. Just make sure to inspect used golf balls for any cracks or damage that could affect the painting process.
Gathering the Necessary Paints
Once you have your golf balls, it’s time to gather the necessary paints. Acrylic paints are a popular choice for painting golf balls due to their vibrant colors, quick drying time, and durability. You can find a wide variety of acrylic paints in art supply stores, with different finishes and shades. Be sure to choose paints that are suitable for outdoor use and are compatible with the golf ball material.
Choosing Brushes and Tools
In addition to paints, you’ll need brushes and tools to create your artwork on the golf balls. A set of fine detail brushes is recommended for painting intricate designs and adding small details. You may also consider using a sponge or a soft brush for applying the base coat. Additionally, having masking tape, stencils, or templates on hand can help simplify the process and ensure clean lines and shapes in your designs.
Preparing the Golf Balls
Before you start painting, it’s important to properly prepare the golf balls to ensure the best results for your artwork. Preparing the golf balls involves cleaning them, removing any old paint, and taping them to create a stable working surface.
Cleaning the Golf Balls
Cleaning the golf balls is an essential step to remove any dirt, oils, or debris that may hinder paint adhesion. Simply fill a bowl with warm water and mild soap, and soak the golf balls for a few minutes. Then, use a soft cloth or sponge to gently scrub away any dirt or grime. Rinse the golf balls thoroughly with clean water and allow them to dry completely before moving on to the next step.
Removing the Old Paint
If you are working with pre-painted golf balls or have previously painted them, you’ll need to remove the old paint before starting your new design. One method for removing paint is to soak the golf balls in a paint stripper solution for a few hours, following the manufacturer’s instructions. Afterward, use a scrub brush to gently remove the loosened paint. Once the old paint is removed, rinse the golf balls thoroughly and let them dry completely.
Taping the Golf Balls
To create a stable working surface for painting, taping the golf balls can be helpful. You can use masking tape or painter’s tape to cover the areas of the golf ball that you don’t want to paint. This will help ensure clean edges and prevent any accidental smudging or spreading of the paint. Take your time to apply the tape carefully and make any necessary adjustments before moving on to the next step.
Applying the Base Coat
The base coat is the foundation of your artwork and sets the stage for all the designs and details you’ll be adding later. Applying a base coat will not only enhance the appearance of your painted golf balls but also provide a smooth and even surface for your designs.
Choosing the Base Color
When selecting the base color for your golf balls, consider the overall theme or aesthetic you want to achieve. A solid color, such as white or black, can serve as a versatile base for different designs. Alternatively, you can choose a color that complements or contrasts with the accent colors you plan to use in your artwork. Make sure the base color is conducive to good visibility of the design and suits your personal preferences.
Applying the First Layer of Paint
To apply the base coat, start by shaking the paint bottle well to ensure an even consistency. Using a sponge or a soft brush, apply the paint to the golf ball in smooth and even strokes. Be careful not to apply too much paint at once, as it can drip or pool on the surface. It’s better to build up the color gradually with multiple thin layers rather than one thick layer. Allow each layer to dry before applying the next one.
Allowing the Base Coat to Dry
After applying the first layer of paint, allow the golf balls to dry completely before proceeding to the next steps. This usually takes about 30 minutes to an hour, depending on the type of paint and the environmental conditions. Be patient and avoid touching or moving the golf balls during this drying period to prevent smudging or uneven drying. Once the base coat is dry to the touch, you can continue with the creative process.

Creating Designs
With the base coat applied and dry, it’s time to unleash your creativity and start painting unique designs on your golf balls. There are various methods you can use to create your designs, whether it’s sketching ideas, using stencils or templates, or experimenting with freehand painting techniques.
Sketching Ideas
Before diving into painting, you may find it helpful to sketch some ideas on paper. This will allow you to plan and visualize your designs before applying them to the golf balls. Consider the theme or motif you want to incorporate, as well as any specific patterns, shapes, or images that resonate with you. Sketching can serve as a valuable guide throughout the painting process and help you stay focused on your desired end result.
Using Stencils or Templates
If you’re looking for precise shapes or patterns, using stencils or templates can be a great way to achieve consistent and professional-looking designs. You can find a wide variety of stencil options in craft stores or create your own using flexible plastic sheets. Secure the stencil or template in place on the golf ball using masking tape, and then carefully apply the paint using a small brush or sponge. Once the paint is dry, carefully remove the stencil to reveal your design.
Freehand Painting Techniques
For those who prefer a more organic and spontaneous approach, freehand painting techniques offer endless possibilities. With a steady hand and some practice, you can create intricate designs, abstract patterns, or even paint small pictures directly on the golf balls. Use fine detail brushes for precision and experiment with different strokes, techniques, and color combinations to bring your imagination to life. Embrace the freedom of freehand painting and let your creativity guide your brush.
Adding Details and Accents
Once you’ve created the main designs, adding details and accents can elevate your painted golf balls to the next level. Details and accents can be used to enhance the overall design, create depth and dimension, or highlight specific areas of interest.
Selecting Accent Colors
When choosing accent colors, think about complementary or contrasting hues that will make your designs pop. Consider colors that add visual interest or create a focal point within your artwork. Metallic or shimmering paints can also be fantastic choices for adding a touch of glamour or elegance to your designs. Experiment with different accent colors to find the ones that truly bring your painted golf balls to life.
Applying Accent Paint
To apply accent paint, use a small brush or sponge and carefully add the desired colors to the designated areas of your designs. Accent colors can be used for details, outlines, shading, or any other elements you want to highlight. Take your time and work with a steady hand to ensure clean and precise application. Remember, details and accents should enhance the overall design without overshadowing the main elements.
Experimenting with Different Techniques
Don’t be afraid to step outside your comfort zone and experiment with different techniques to add variety and interest to your painted golf balls. You can try techniques like blending colors, layering paints, creating texture using different brush strokes, or even using unconventional tools like toothpicks or sponges for unique effects. Exploring new techniques will not only make your artwork more dynamic but also expand your artistic skills and possibilities.
Adding Logos or Personalizations
If you want to take your painted golf balls to the next level of personalization, adding logos or personalizations can be a fantastic way to make them truly one-of-a-kind. Whether you want to represent your favorite sports team, display your initials, or showcase a special symbol, there are a few steps to follow when incorporating logos or personalizations into your designs.
Choosing Logos or Personalization Options
Start by selecting the logos or personalization options you want to include on your golf balls. You can search online for high-resolution images of logos or symbols that hold significance to you. Alternatively, you can create your own custom designs using graphic design software or by hand-drawing them. Consider the size and placement of the logos or personalizations to ensure they fit well within the overall design of the golf ball.
Transferring the Design
To transfer the logos or personalizations onto the golf balls, you can use a variety of methods. One option is to print the designs onto transfer paper and carefully apply them to the golf balls following the manufacturer’s instructions. Another option is to trace the designs onto tracing paper and then transfer them onto the golf balls using transfer gel or a fine-tip marker. Whichever method you choose, take your time and work with care to ensure accurate placement and alignment.
Painting or Stamping the Logos
Once the design is transferred, you can use fine detail brushes and suitable paint colors to paint the logos or personalizations onto the golf balls. Alternatively, if you prefer a quicker and easier method, you can use custom-made stamps or even rubber stamps to apply the designs using ink. Experiment with different techniques to achieve the desired effect and ensure that the logos or personalizations are well-integrated into the overall artwork.
Allowing the Paint to Dry
After completing the painting process, it’s crucial to allow the paint to dry thoroughly before moving on to the next steps. Drying time can vary depending on factors such as the type of paint used, the number of layers, and the environmental conditions. To ensure the best results, follow these guidelines for proper drying of your painted golf balls.
Determining Drying Time
Refer to the instructions provided by the paint manufacturer for an approximate drying time. However, it’s essential to note that these are general guidelines, and the specific conditions in your environment may affect drying time. It’s always better to err on the side of caution and allow the paint to dry for at least 24 hours or longer, if possible. Patience is key when it comes to achieving a durable and long-lasting finish.
Ensuring Proper Ventilation
While the paint is drying, ensure that the area is well-ventilated to promote airflow and aid in the drying process. Open windows or use fans to circulate the air, especially if you’re working indoors. Adequate ventilation will help the paint dry evenly and prevent any potential smudging or sticking of the golf balls to surfaces they come in contact with.
Avoiding Smudging or Smearing
To avoid smudging or smearing the paint while the golf balls are drying, handle them with care and avoid touching any painted areas. If you need to move the golf balls, use clean and dry gloves or carefully hold them by areas that are not painted. It’s better to be cautious and wait until the paint is completely dry before handling the golf balls extensively.
Applying a Protective Coating
To ensure the longevity and durability of your painted golf balls, applying a protective coating is highly recommended. The protective coating acts as a barrier between the paint and external elements, such as moisture, dirt, and UV rays, offering added protection and preserving the quality of your artwork.
Choosing a Clear Coat
Select a clear coat specifically designed for outdoor use and suitable for the type of paint you used. Look for a clear coat that offers UV protection to prevent fading and yellowing over time. Matte, satin, or gloss finishes are available, depending on your desired final appearance. Take into consideration that some clear coats may slightly alter the color or finish of your painted golf balls, so it’s a good idea to conduct a test on a small area before applying it to the entire surface.
Spraying or Brushing the Protective Coating
To apply the clear coat, read the instructions provided by the manufacturer and follow them carefully. Depending on the type of clear coat you choose, you can either spray it onto the golf balls or use a small brush to apply it evenly. If using a spray, hold the can at a distance and use thin, even coats to prevent drips and pooling. If using a brush, make sure to use smooth and consistent strokes, covering the entire surface of the golf balls. Reapply additional coats as necessary, allowing each coat to dry between applications.
Curing the Coating
After applying the protective coating, allow the golf balls to cure according to the manufacturer’s instructions. The curing time can range from a few hours to several days, depending on the specific product and environmental conditions. Avoid touching or using the golf balls during the curing process, as this can disrupt the formation of a hard and durable protective layer. Once the clear coat is completely cured, your painted golf balls will be ready for use and display.
Caring for Painted Golf Balls
To maintain the appearance and longevity of your painted golf balls, proper care is essential. While they are durable, painted golf balls require some attention to preserve their original beauty and protect the artwork you’ve created.
Avoid Excessive Rough Use
While it’s tempting to showcase your painted golf balls in action, excessive rough use can cause the paint to chip or peel over time. It’s best to reserve your painted golf balls for special occasions or use them as display pieces rather than using them in competitive or demanding golf games. Treat them with care to ensure their longevity and enjoy them for years to come.
Cleaning the Balls Properly
When it’s time to clean your painted golf balls, make sure to use gentle and non-abrasive methods. Fill a bucket with warm water and mild soap, and soak the golf balls for a few minutes. Then, use a soft cloth or sponge to gently wipe away any dirt or debris. Avoid using harsh chemicals, abrasive scrub brushes, or abrasive materials, as these can damage or remove the paint from the golf balls. After cleaning, rinse the golf balls thoroughly with clean water and pat them dry with a soft towel.
Checking for Damage or Wear
Regularly inspect your painted golf balls for any signs of damage or wear. Look for chips, cracks, or discoloration that may require touch-ups or repairs. If you notice any areas that need attention, carefully remove any loose or damaged paint, apply a small amount of matching paint, and allow it to dry thoroughly. Performing these small touch-ups as needed will help maintain the overall appearance and integrity of your painted golf balls.
Conclusion
Painting golf balls is a wonderful way to personalize your golfing experience and unleash your creativity. By choosing the right supplies, preparing the golf balls properly, and following the step-by-step process, you can create unique and eye-catching artwork on your golf balls. Whether you’re a seasoned artist or a beginner, the journey of painting golf balls is filled with enjoyment and the opportunity to explore new ideas and techniques. So grab your supplies, let your imagination run wild, and embark on an exciting adventure of transforming ordinary golf balls into extraordinary pieces of art. Enjoy the creative process, personalize your golfing experience, and discover the joy of expressing yourself through painted golf balls.