If you’re a proud owner of a golf cart and want to ensure it’s running smoothly, one key aspect to consider is the brakes. In this step-by-step guide, we will walk you through the process of adjusting the brakes on your golf cart. By following these simple instructions, you’ll be able to maintain the optimal performance of your golf cart and ensure a safe and enjoyable ride on the greens. So grab your tools and let’s get started on this straightforward and important task!
A Step-by-Step Guide to Adjusting Brakes on a Golf Cart
Whether you use your golf cart for leisurely rides around the neighborhood or for getting around the golf course, it’s important to ensure that your brakes are functioning properly. Like any vehicle, over time, brakes can wear down and require adjustment or replacement. In this comprehensive guide, we will walk you through the process of adjusting the brakes on your golf cart, from gathering the necessary tools to troubleshooting potential issues. So let’s grab our tools and get started!

1. Gather the Necessary Tools
Before you begin adjusting the brakes on your golf cart, it is essential to gather all the necessary tools to ensure a smooth process. Here are the tools you will need:
1.1 Jack and Jack Stands
To safely lift your golf cart off the ground, you will need a reliable jack and a set of jack stands. These will provide the stability needed when working on the brake system.
1.2 Lug Wrench
A lug wrench is indispensable when it comes to removing the wheel covers. It allows you to loosen and tighten the lug nuts without any difficulties.
1.3 Brake Adjusting Tool
A brake adjusting tool is a specialized tool that will come in handy when adjusting the brake pedal mechanism. It allows for precise adjustments to achieve the desired brake pedal tension.
1.4 Pliers
Pliers are versatile tools that will be useful during the brake adjustment process. They can help with removing any retaining clips or pins that may be holding the brake pads or shoes in place.
1.5 Wrench Set
A wrench set, including both open-end and socket wrenches, will be necessary for loosening and tightening various bolts and nuts within the brake system.
Now that we have all the necessary tools, let’s move on to preparing the golf cart for brake adjustment.
2. Prepare the Golf Cart
Before diving into the brake adjustment process, it is important to properly prepare your golf cart. Follow these steps to ensure a safe and effective brake adjustment:
2.1 Park in a Level Area
Find a level area where you can comfortably work on your golf cart. This will provide stability and prevent any accidents or mishaps during the brake adjustment process.
2.2 Engage Parking Brake
Make sure to engage the parking brake before beginning any work on the brakes. This will prevent the golf cart from rolling or moving while you are working on it.
2.3 Turn off the Power
To avoid any potential electrical hazards, be sure to turn off the power to your golf cart. This will ensure that no accidental movement or engagement of the motor occurs while performing brake adjustments.
2.4 Locate the Brake System
Take a moment to familiarize yourself with the location of the brake system on your golf cart. This will make it easier to access the brake pads and shoes when you begin the inspection and adjustment process.
Now that your golf cart is properly prepared, let’s move on to inspecting the brake pads.
3. Inspect the Brake Pads
The brake pads play a crucial role in stopping your golf cart when the brakes are applied. Over time, these pads can wear down and may require replacement. Follow these steps to inspect and replace worn brake pads:
3.1 Remove Wheel Covers
Using your lug wrench, carefully remove the wheel covers from the wheels on which you will be inspecting the brake pads. Set the wheel covers aside in a safe place, away from the work area.
3.2 Inspect Brake Pads for Wear
Take a close look at the brake pads to assess their wear. If you notice that they are significantly worn or have uneven wear patterns, it’s time to replace them. Worn brake pads can reduce the efficiency of your brakes and jeopardize your safety.
3.3 Replace Worn Brake Pads
If your inspection reveals that the brake pads are indeed worn, it’s essential to replace them promptly. Using pliers, remove any retaining clips or pins that may be securing the brake pads. Once removed, take out the worn brake pads and replace them with new ones specifically designed for your golf cart’s make and model.
Congratulations! You have successfully inspected and replaced the worn brake pads on your golf cart. Now, let’s move on to adjusting the brake pedal.

4. Adjust the Brake Pedal
The brake pedal on your golf cart determines the tension needed for effective braking. Here’s how you can adjust the brake pedal to ensure optimal performance:
4.1 Locate the Brake Pedal Adjustment Mechanism
Take a look under your golf cart’s dashboard to locate the brake pedal adjustment mechanism. This mechanism varies by make and model, but it is typically a threaded bolt or rod that can be tightened or loosened to adjust the pedal tension.
4.2 Tighten or Loosen the Adjustment Mechanism
Using the appropriate wrench or brake adjusting tool, turn the threaded bolt or rod to either tighten or loosen the adjustment mechanism. If your brake pedal feels too loose, tighten the adjustment mechanism. Conversely, if the brake pedal feels too tight or rigid, loosen the adjustment mechanism gradually until you achieve the desired tension.
4.3 Test the Brake Pedal for Proper Tension
With the adjustment made, it’s time to test the brake pedal for proper tension. Engage and disengage the brake pedal multiple times, noting whether it feels responsive and provides the necessary stopping power. If the brake pedal feels too sensitive or lacks sufficient tension, make further adjustments until you achieve the desired results.
Great job! Your brake pedal is now properly adjusted, ensuring a more comfortable and efficient braking experience. Now let’s move on to adjusting the brake shoes.
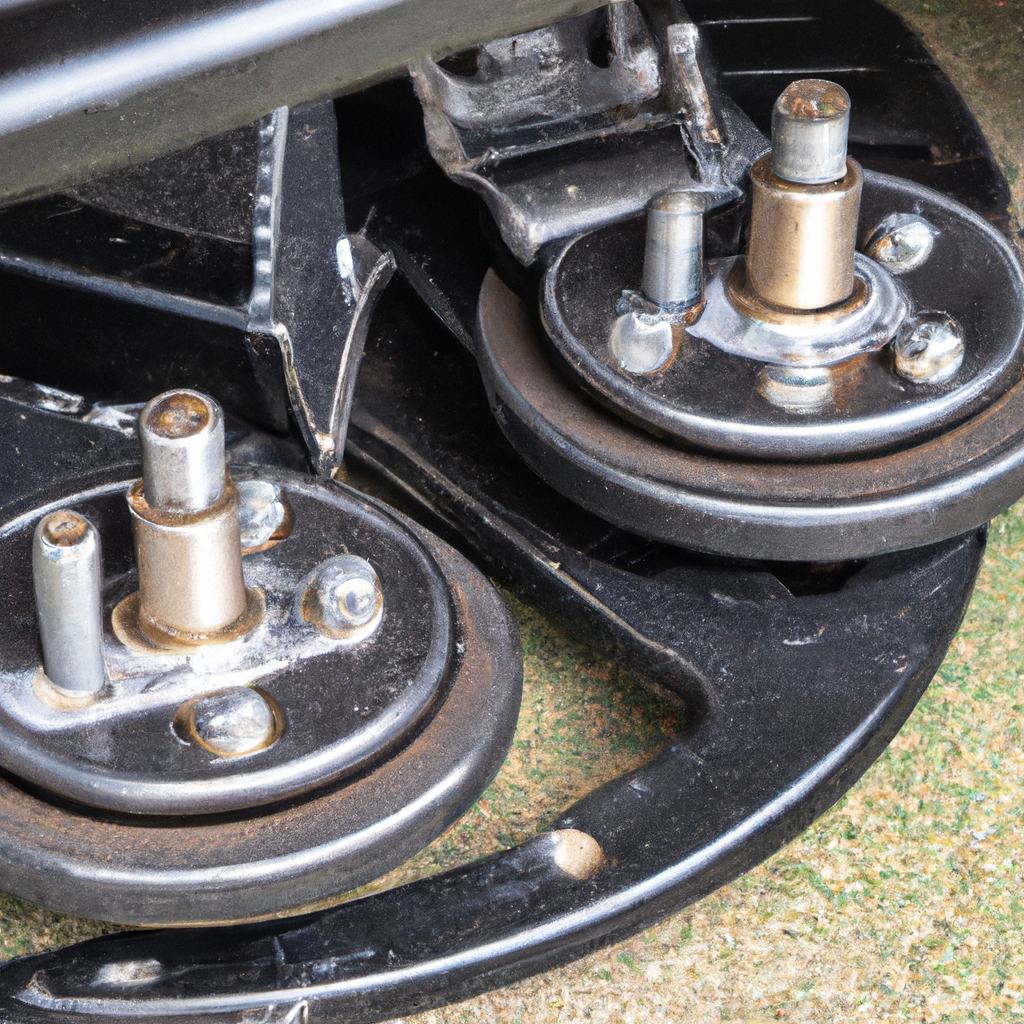
5. Adjust the Brake Shoes
In addition to brake pads, your golf cart may also have brake shoes that contribute to stopping power. Here’s how you can adjust the brake shoes for optimal performance:
5.1 Lift the Golf Cart with a Jack
To gain access to the brake shoes, use a reliable jack to lift your golf cart off the ground. Place the jack in an appropriate position, usually under the frame or chassis, and carefully lift the golf cart until the wheels are off the ground.
5.2 Secure Cart with Jack Stands
To ensure stability and safety while working on the brake shoes, place jack stands under the frame or chassis of the golf cart. Lower the jack slowly until the weight of the golf cart is resting on the jack stands.
5.3 Locate the Brake Shoe Adjustment Mechanism
Depending on the make and model of your golf cart, you may find an adjustment mechanism for the brake shoes. This mechanism is usually located near the brake drum assembly and can be tightened or loosened to adjust the tension of the brake shoes.
5.4 Adjust the Brake Shoes Using the Adjustment Mechanism
Using either a wrench or pliers, tighten or loosen the adjustment mechanism to achieve the desired tension for the brake shoes. It’s essential to make small adjustments and test the brakes between each adjustment to ensure optimal performance.
Well done! You have successfully adjusted the brake shoes on your golf cart. Let’s move on to testing the brakes.
6. Test the Brakes
After making adjustments to the brake pads, pedal, and shoes, it’s crucial to test the brakes to ensure they are functioning correctly. Follow these steps to perform a thorough test:
6.1 Lower the Golf Cart
Carefully raise the jack until the jack stands are no longer supporting the weight of the golf cart. Slowly lower the golf cart to the ground, ensuring that it is stable before proceeding.
6.2 Remove the Jack Stands
With the golf cart safely on the ground, remove the jack stands and set them aside in a safe location. This will allow the wheels to make full contact with the ground during the brake test.
6.3 Test the Brakes for Proper Functioning
Move to a clear and open area where you can safely test the brakes. Engage and disengage the brake pedal repeatedly, ensuring that the golf cart comes to a complete stop each time. Pay close attention to any abnormal noises or difficulties in braking, as these may indicate further adjustments or repairs are needed.
6.4 Repeat Adjustments if Necessary
If your brake test reveals any issues or unsatisfactory performance, repeat the adjustment process for the specific component that requires modification. Whether it’s the brake pads, pedal, or shoes, make gradual adjustments until the brakes are functioning optimally.
7. Regular Brake Maintenance
To ensure the longevity and reliability of your golf cart’s brake system, regular maintenance is crucial. Here are some maintenance tasks you should perform:
7.1 Check Brake Fluid Levels
Inspect the brake fluid levels regularly and top up if necessary. Adequate brake fluid levels are essential for the proper functioning of the brakes.
7.2 Inspect Brake Lines for Leaks or Damage
Inspect the brake lines for any signs of leaks or damage. Look for wet spots, corrosion, or any visible wear and tear. Address any issues promptly to avoid further damage to the brake system.
7.3 Apply Lubricant to Moving Parts
To maintain smooth and efficient operation, apply a suitable lubricant to the moving parts of the brake system. This will help reduce friction and prolong the life of the components.
7.4 Schedule Regular Brake System Checks
Consider scheduling regular maintenance checks with a qualified professional. A trained technician will be able to identify potential issues before they escalate and ensure that your golf cart’s brakes are in good working order.
8. Troubleshooting Braking Issues
If you experience any braking issues while operating your golf cart, follow these steps to troubleshoot the problem:
8.1 Identify Common Braking Issues
Become familiar with common braking issues such as squeaking, grinding, or reduced stopping power. Understanding these symptoms will help you identify the potential cause of the problem.
8.2 Check the Brake Pedal and Linkage
Inspect the brake pedal and its linkage for any signs of damage or misalignment. Ensure that the pedal moves smoothly and without any unusual resistance.
8.3 Inspect Brake Pads and Shoes
Inspect the brake pads and shoes for wear and tear. Look for any signs of uneven wear, excessive thinning, or damage. If necessary, replace worn-out components promptly.
8.4 Test the Brake System for Proper Function
Perform a thorough brake test as outlined in Section 6 to assess the performance of the braking system. If you notice any abnormalities during the test, further investigation or adjustments may be necessary.
9. Safety Precautions
When working on your golf cart’s brakes, it is crucial to prioritize safety. Here are some safety precautions to keep in mind:
9.1 Wear Safety Goggles and Gloves
Protect your eyes and hands by wearing safety goggles and gloves. This will help prevent injuries from flying debris or accidental contact with sharp edges.
9.2 Use Jack Stands for Stability
Always use jack stands when lifting your golf cart off the ground. Failure to do so can result in the golf cart falling and causing significant damage or injury.
9.3 Follow Manufacturer Instructions
Consult your golf cart’s owner’s manual for specific instructions related to brake adjustment and maintenance. Each golf cart model may have its unique requirements and specifications.
9.4 Take Necessary Precautions to Avoid Injury
Exercise caution and take your time when working on the brake system. Rushing or taking shortcuts can result in accidents that could cause injury or damage to your golf cart.
10. Seek Professional Help if Needed
While adjusting the brakes on your golf cart can often be done at home, there may be instances where professional assistance is required. Here are a few reasons why you might consider seeking help from a professional:
10.1 Consider Professional Assistance
If you are unfamiliar with brake systems or lack confidence in adjusting them yourself, it’s wise to seek help from a trained professional. They have the expertise and experience to ensure the job is done correctly.
10.2 Contact Golf Cart Dealer or Repair Center
Reach out to your golf cart dealer or a reputable repair center for assistance. They will have the knowledge and resources to diagnose and repair any complex brake issues that may arise.
10.3 Avoid Attempting Complex Repairs if Unsure
If you encounter complex brake issues or find yourself unsure of the necessary repairs, it’s best to leave it to the professionals. Attempting complex repairs without the required expertise may worsen the problem and compromise your safety.
By following this comprehensive guide, you now have the knowledge and tools to confidently adjust the brakes on your golf cart. Remember to prioritize safety, perform regular maintenance, and seek professional help when necessary. With properly adjusted brakes, you can enjoy a smooth and safe ride on your golf cart for years to come.